

Imagine the smooth, cold embrace of a velvety frozen dessert, where the delicate whisper of rose meets the satisfying crunch of pistachios, all underpinned by a subtly tangy cheesecake creaminess. Just last summer, I swore off store-bought ice cream forever after a disappointing tub tasted like sadness. My quest for true frozen joy led me to this magnificent creation, proving homemade truly conquers all blandness.
Why You’ll Love This Recipe
This delightful dessert is an absolute game-changer, incredibly simple to whip up, making homemade ice cream surprisingly accessible for anyone. Its truly unique flavor profile, a sophisticated dance of floral rose and nutty pistachios with a creamy cheesecake tang, will impress even the most discerning palates. Beyond taste, the vibrant colors and artful swirl make it a stunning centerpiece for any gathering, and its components can be easily adapted for various preferences.
Ingredients
Here’s what you need for this delicious dish:
The complete ingredient list, including quantities, can be found directly under the recipe card.
Step-by-Step Instructions
Follow these simple steps to prepare this delicious dish:
Step 1: Create the Velvety Cream Base
In a medium saucepan, gently combine the heavy cream, whole milk, and granulated sugar. Place the saucepan over medium heat, stirring occasionally, until all the sugar crystals have completely dissolved and the mixture is warm to the touch but definitely not boiling. Immediately remove it from the heat to prevent overheating.
Step 2: Infuse Cheesecake Goodness and Chill
In a separate bowl, take your softened cream cheese and whisk it until it achieves a beautifully smooth consistency. Gradually pour approximately half a cup of your warm cream mixture into the cream cheese, whisking continuously until it is completely smooth and lump-free. Pour this enhanced cream cheese mixture back into the saucepan with the remaining cream base and stir thoroughly to combine everything. Now, add the salt, fragrant rose water, pure vanilla extract, and if desired, the green food coloring to the mixture. Stir until these elements are perfectly distributed throughout the base. Cover your mixture and refrigerate it for a minimum of four hours, or ideally, allow it to chill overnight to ensure it is thoroughly cold.
Step 3: Churn to Soft-Serve Perfection
Once your ice cream base is perfectly chilled, pour it into your ice cream maker. Churn the mixture according to your specific manufacturer’s instructions until it reaches a delightful soft-serve consistency. This usually takes about 20-30 minutes, but follow your machine’s guide for the best texture. During the final five minutes of this churning process, gently incorporate half of your roughly chopped pistachios into the ice cream maker.
Step 4: Swirl in the Rose and Pistachio Layers
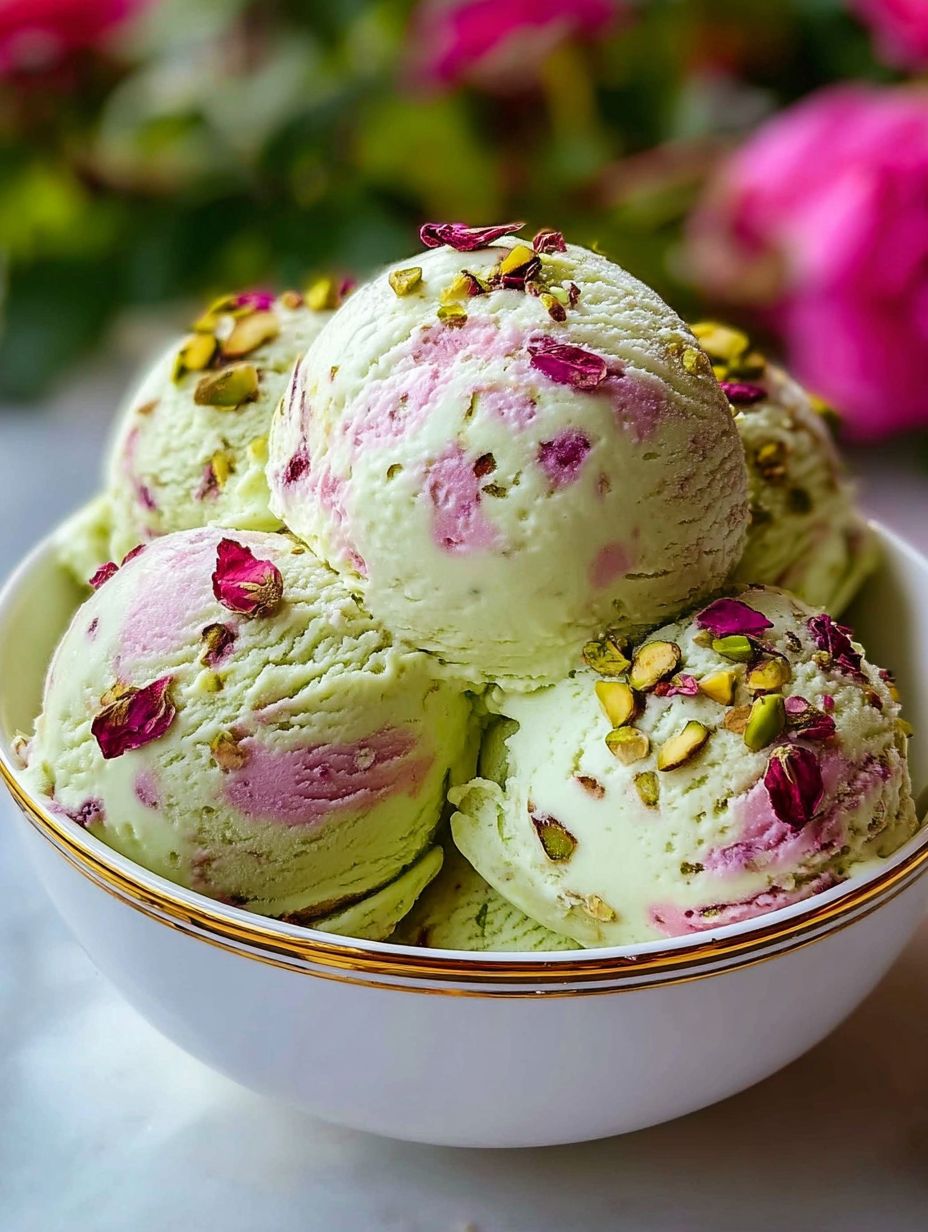
Carefully transfer half of the freshly churned ice cream into a freezer-safe container. Drizzle about half of the fragrant rose jam or thick rose syrup over this layer. Using a knife or a spoon, gently swirl the jam into the ice cream to create beautiful ribbons of color and flavor. Sprinkle a generous portion of the remaining chopped pistachios over this swirled layer. Now, add the remaining churned ice cream on top, drizzle with the rest of the rose jam or syrup, and swirl again to continue the artistic pattern. Top generously with the very last of the chopped pistachios.
Step 5: Freeze for Ultimate Indulgence
Cover the container securely with a lid or plastic wrap, ensuring it is airtight. Place it in the freezer for at least four to six hours, or until the ice cream is completely firm. For the best experience, allow it to sit out for a few minutes before scooping, then garnish with an extra sprinkle of pistachios and serve immediately to enjoy the delightful texture and intricate flavors.
Tips for the Perfect Homemade Rose Pistachio Cheesecake Ice Cream
Making exceptional frozen treats at home is all about paying attention to a few crucial details. First, ensure your ice cream base is thoroughly chilled before it even touches the churner; this is vital for achieving that incredibly creamy texture and preventing icy crystals. Think of it as a beauty sleep for your dairy. If you crave an even more pronounced floral note, feel free to add an additional quarter teaspoon of rose water to the mixture. For those perfectly crunchy pistachio bits that stand out against the smooth ice cream, consider toasting them lightly in a dry pan for a few minutes before you chop and add them. This simple step intensifies their flavor and maintains their delightful crispness. Finally, if your rose jam or syrup seems a bit too stiff to swirl elegantly, a quick gentle warming will make it more pliable and ensure those beautiful ribbons flow effortlessly through your cheesecake ice cream. These small adjustments can elevate your homemade rose pistachio ice cream from good to absolutely unforgettable.
Why Homemade is Always Better
There’s an undeniable magic to creating culinary delights from scratch, especially when it comes to something as universally loved as ice cream. When you make your own, you gain complete control over every single ingredient. This means saying goodbye to artificial flavors, unnecessary preservatives, and excessive sweetness. You get to choose the freshest heavy cream, the richest whole milk, and exactly how much rose water you desire. The flavor of a homemade dessert is simply unparalleled, boasting a depth and freshness that store-bought versions rarely achieve. Beyond the ingredients, there’s the sheer satisfaction of crafting something beautiful and delicious with your own hands. Plus, the ability to customize to your heart’s content, whether adjusting the rose intensity or adding extra crunchy pistachios, makes the experience uniquely yours. This commitment to fresh, quality components shines through in every spoonful of your rose pistachio cheesecake ice cream.
Serving Suggestions for Your Frozen Delight
Once you’ve perfectly frozen your luscious Homemade Rose Pistachio Cheesecake Ice Cream, the next delightful step is deciding how to serve it! This elegant frozen treat stands beautifully on its own, showcasing its unique blend of flavors. For a truly elevated experience, consider pairing a scoop with a light, buttery shortbread cookie, which provides a lovely contrast in texture. A delicate drizzle of honey or a sprinkle of extra unshelled pistachios can enhance the existing notes. It also makes a fantastic accompaniment to a simple fruit salad, particularly with berries that offer a tart counterpoint to its richness. Imagine a small bowl of this delightful rose pistachio ice cream alongside a warm slice of pound cake or even a freshly baked crêpe. The possibilities are endless for enjoying this sophisticated and creamy dessert.
Nutritional Information
Understanding what goes into your meals, especially treats, is always a good idea. This section provides a clear breakdown of the nutritional content for this delightful dessert.
Nutritional Breakdown
Here’s a snapshot of the nutritional value per serving:
Calories: 380
Protein: 4g
Carbs: 30g
Fat: 28g
Serving Size
This recipe yields approximately 6-8 generous servings, perfect for sharing with family and friends, or for enjoying over a few indulgent evenings.
Your Next Frozen Masterpiece Awaits
So, there you have it: a journey from everyday ingredients to an extraordinary frozen treat. Making Homemade Rose Pistachio Cheesecake Ice Cream is more than just following a recipe; it is an act of culinary adventure and self-care. The joy of scooping that first perfect spoonful, witnessing the vibrant rose swirls, and tasting the delicate balance of creamy, floral, and nutty notes is truly unparalleled. Don’t be intimidated; the steps are simple, and the reward is immense. Get out your ice cream maker, gather your ingredients, and prepare to impress yourself and everyone lucky enough to share in this unique dessert. Trust me, your taste buds will thank you for this delightful and memorable experience.
Mastering the Secrets of Cooking
Achieving perfect results with this creamy dessert hinges on thorough chilling; ensure your base for the rose pistachio cheesecake ice cream is completely cold, preferably overnight, before churning. This critical step ensures a smooth, luscious texture and prevents icy mishaps, making your efforts truly worthwhile.
Make Your Recipe Unique
Customize your creation by adjusting the rose water quantity for a subtle hint or a more pronounced floral note. Feel free to omit the green food coloring if you prefer a naturally creamy white appearance. For the shelled pistachios, consider using finely crushed pieces instead of roughly chopped for a different textural experience in every spoonful.
Smart Storage & Reheating
To preserve the delightful creaminess and prevent ice crystals, always store your Homemade Rose Pistachio Cheesecake Ice Cream in a tightly sealed, freezer-safe container. This ensures the luxurious texture remains intact and the pistachios maintain their satisfying crunch for delightful future servings.
The Chef’s Golden Tips
My first attempt at crafting this exquisite rose pistachio cheesecake ice cream was pure magic. The delicate floral notes mingling with tangy cream cheese and crunchy pistachios was an unexpected journey for my taste buds, leaving me utterly enchanted.
Final Thoughts
This delightful frozen dessert, with its unique blend of creamy cheesecake, fragrant rose, and crunchy pistachios, offers an indulgence like no other. Imagine the cool, smooth texture melting on your tongue, followed by those subtle floral notes and the satisfying crunch of nuts. It’s a truly sophisticated treat that promises to elevate any occasion. Don’t just dream about this exquisite ice cream; gather your ingredients and whip up your own batch of Homemade Rose Pistachio Cheesecake Ice Cream today. Your taste buds will thank you for this refreshing and harmonious experience!
Print
Homemade Rose Pistachio Cheesecake Ice Cream
- Total Time: 20 minutes
- Yield: 6-8 1x
Description
This Rose Pistachio Cheesecake Ice Cream offers a delightful blend of creamy texture and sophisticated flavors. The base is a rich, tangy cheesecake-infused ice cream, gently swirled with fragrant rose and studded with crunchy pistachios. Each spoonful delivers a harmonious balance of sweet, floral, and nutty notes, culminating in a refreshing and indulgent frozen dessert.
Ingredients
- 2 cups heavy cream
- 1 cup whole milk
- 3/4 cup granulated sugar
- 4 ounces cream cheese, softened
- 1/4 teaspoon salt
- 1 teaspoon rose water
- 1/2 teaspoon pure vanilla extract
- 2–3 drops green food coloring (optional, for pistachio hue)
- 1/2 cup shelled pistachios, roughly chopped
- 1/4 cup rose jam or thick rose syrup, for swirling
Instructions
- In a medium saucepan, combine heavy cream, whole milk, and granulated sugar. Heat over medium heat, stirring occasionally, until the sugar is fully dissolved and the mixture is warm but not boiling. Remove from heat.
- In a separate bowl, whisk the softened cream cheese until smooth. Gradually add about 1/2 cup of the warm cream mixture to the cream cheese, whisking constantly until fully incorporated and smooth.
- Pour the cream cheese mixture back into the saucepan with the remaining cream mixture. Stir well to combine.
- Add the salt, rose water, vanilla extract, and green food coloring (if using) to the mixture. Stir until evenly distributed.
- Cover the mixture and refrigerate for at least 4 hours, or preferably overnight, until thoroughly chilled.
- Once chilled, pour the ice cream base into your ice cream maker and churn according to the manufacturer's instructions until it reaches a soft-serve consistency.
- During the last 5 minutes of churning, add half of the chopped pistachios to the ice cream maker.
- Transfer half of the churned ice cream to a freezer-safe container. Drizzle with half of the rose jam/syrup and gently swirl with a knife or spoon. Sprinkle with some of the remaining pistachios.
- Add the rest of the ice cream, drizzle with the remaining rose jam/syrup, and swirl again. Top with the remaining chopped pistachios.
- Cover the container tightly and freeze for at least 4-6 hours, or until firm, before serving.
Notes
Ensure your ice cream base is thoroughly chilled before churning for the best results.
For a stronger rose flavor, you can add an additional 1/4 teaspoon of rose water.
To prevent pistachios from becoming too soft, toast them lightly before adding to the ice cream.
If your rose jam is too thick to swirl, gently warm it slightly to make it more pliable.
- Prep Time: 20 minutes
- Cook Time: 0 minutes (plus chilling and churning)
Nutrition
- Calories: 380
- Fat: 28g
- Carbohydrates: 30g
- Protein: 4g
FAQs
Why is it important to thoroughly chill the ice cream base?
Chilling the ice cream base for at least four hours, or preferably overnight, is a crucial step for achieving the best possible texture in your finished frozen dessert. A thoroughly chilled base allows the fat molecules to firm up and the ingredients to fully meld, leading to a much smoother and creamier consistency when churned. If the base isn’t cold enough, the ice cream may turn out icy or granular, and it won’t churn as efficiently. Planning ahead for this chilling period ensures a truly indulgent treat.
How can I ensure the pistachios remain crunchy in the ice cream?
To prevent the pistachios from becoming too soft once mixed into your ice cream, a helpful tip is to lightly toast them before adding. This process enhances their flavor and also helps maintain their delightful crunch against the creamy backdrop of the cheesecake ice cream. It’s also specified to add the chopped nuts during the last five minutes of churning, which minimizes their exposure time to the liquid base. By following these simple steps, you’ll enjoy satisfying nutty bites throughout your scoop.
What should I do if my rose jam is too thick to swirl?
If you find that your rose jam or thick rose syrup is too dense to create those beautiful swirls within the ice cream, a simple solution is to gently warm it. Placing the jam in a small microwave-safe bowl for a few seconds or in a small saucepan over very low heat can make it more pliable. This slight warming will thin it out just enough to allow you to easily drizzle and swirl it through the churned ice cream, ensuring an even distribution of its fragrant flavor.
Can I adjust the intensity of the rose flavor?
Absolutely! The recipe uses one teaspoon of rose water for a balanced floral note. However, if you prefer a more pronounced rose flavor in your Homemade Rose Pistachio Cheesecake Ice Cream, the recipe suggests adding an additional one-quarter teaspoon of rose water to the mixture. This slight adjustment will amplify the aromatic essence without overpowering the delicate cheesecake and pistachio elements. Remember to add it along with the other flavorings in step four, ensuring it’s well distributed throughout the chilled base.