

Imagine the luxurious embrace of rich coffee and deep cocoa mingling with a velvety vanilla layer, all culminating in a surprisingly light, pudding-like texture that melts on your tongue. After a disastrous attempt at traditional tiramisu that looked like a coffee-soaked sponge earthquake, discovering this healthy tiramisu chia pudding felt like finding a culinary superpower.
Reasons Why You’ll Love This Recipe
Forget complicated baking projects and endless dishwashing. This simple, no-bake treat makes dessert dreams a reality with minimal fuss, transforming everyday ingredients into an extraordinary experience. Its distinct coffee and vanilla layers offer a sophisticated flavor profile that stands out from typical sweet offerings, creating a delightful balance of indulgence and lightness. The elegant presentation, with its contrasting layers and cocoa dusting, makes it a showstopper, perfect for impressing guests or simply treating yourself. Plus, its adaptable nature means you can enjoy it for breakfast, dessert, or even a wholesome snack.
Diving into the Deliciousness: What You’ll Need
Here’s what you need for this delicious dish:
: Provides the essential robust flavor for our healthy tiramisu chia pudding. Ensure it is completely cooled.
: The creamy, dairy-free base for both pudding layers.
: The magic ingredient that creates a thick, satisfying pudding texture, packed with nutrients for this easy no-bake treat.
: Delivers deep chocolate notes and rich color, complementing the coffee.
: A natural sweetener, balancing flavors without refined sugars.
: Adds warmth and sweetness, enhancing all other ingredients.
: Crucial for boosting and harmonizing both sweet and bitter notes.
: Transforms into an incredibly smooth, dairy-free cream for the middle layer. Proper soaking is key for a silky texture.
: Helps blend cashews into a luscious, pourable cream.
: Sweetens the vanilla layer, complementing the coffee-infused pudding.
: Infuses classic, comforting essence, balancing the bolder flavors.
: Adds a bright, subtle tang, enhancing creaminess.
: Highlights sweetness and vanilla, ensuring this layer truly shines.
: Natural sweetness and sticky binder for our chewy truffle topping.
: Adds wholesome structure and texture to the truffles.
: Delivers intense chocolate flavor to the truffles.
: Helps bind and adds rich, nutty depth.
: Used to achieve a pliable dough for rolling.
: The final dusting, providing visual appeal and a classic bitter chocolate note.
All ingredients with their exact quantities can be found in the recipe card below.
Crafting Your Creamy Dream: Step-by-Step
Here’s a simple guide to help you prepare this delicious recipe:
Mixing and Chilling Your Base Layers
Step 1: Whisk Up the Coffee Chia Pudding
In a medium bowl, whisk together the completely cooled strong brewed coffee, 1/2 cup unsweetened plant-based milk, 3 tablespoons chia seeds, 1 tablespoon unsweetened cocoa powder, 2 tablespoons maple syrup, 1/2 teaspoon vanilla extract, and a pinch of salt. Stir this mixture well to ensure all ingredients are thoroughly combined and there are no clumps of chia seeds. Allow it to sit for 5 minutes, then give it another good stir. Cover the bowl and refrigerate it for at least 4 hours, or preferably overnight, until the mixture has thickened into a delightful pudding consistency. This sets the stage for our healthy tiramisu chia pudding.
Step 2: Blend the Velvety Vanilla Layer
Begin by thoroughly draining your soaked raw cashews. In a high-speed blender, combine these drained cashews with 1/4 cup unsweetened plant-based milk, 2 tablespoons maple syrup, 1/2 teaspoon vanilla extract, the optional 1/4 teaspoon lemon juice (if you desire a slight tang), and a pinch of salt. Blend these ingredients until the mixture becomes completely smooth and creamy. You may need to pause and scrape down the sides of the blender a few times to achieve a truly silky, lump-free texture. This step is crucial for the luscious middle layer of your easy no-bake treat.
Adding the Optional Topping
Step 3: Craft the Optional Chocolate Truffle Topping
For those extra special touches, prepare the chocolate truffle topping. In a food processor, combine the 1/4 cup packed pitted Medjool dates, 1/4 cup rolled oats, 2 tablespoons unsweetened cocoa powder, and 1 tablespoon nut butter. Pulse the mixture until a sticky dough begins to form. If the mixture appears too dry to come together into a cohesive dough, add plant-based milk, 1 tablespoon at a time, until you achieve a pliable dough. Roll this mixture into small, bite-sized balls, aiming for about 15-20 truffles. Place them onto a plate lined with parchment paper and refrigerate for 15-30 minutes to allow them to firm up.
Layering and Finishing Your Delight
Step 4: Layer Your Tiramisu-Inspired Treat
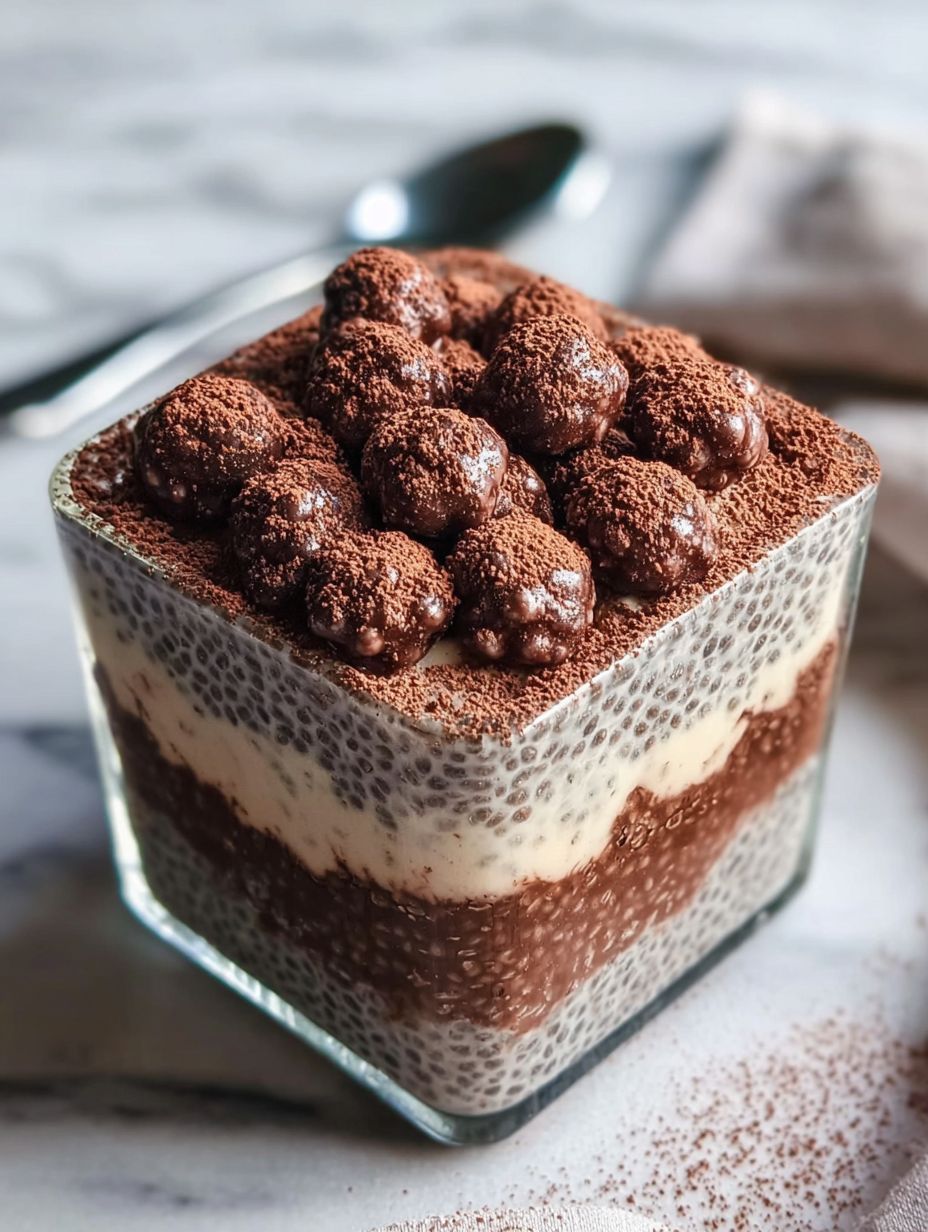
Now for the fun part: assembly! Divide half of your prepared coffee chia pudding evenly between two serving glasses or jars. Gently top this dark layer with the creamy vanilla layer, spreading it carefully to create a distinct light middle section. Finally, add the remaining coffee chia pudding on top, completing the signature layered look of this delightful dessert.
Step 5: Garnish with Cocoa and Truffles
To truly capture the tiramisu aesthetic, generously dust the top of your assembled puddings with the remaining 1 teaspoon of unsweetened cocoa powder. If you’ve prepared the chocolate truffle topping, artfully arrange the chilled truffle balls on top of the cocoa-dusted pudding, adding both visual appeal and an extra dimension of flavor and texture.
Step 6: Chill and Serve for Optimal Flavor
Refrigerate your beautifully assembled puddings for a minimum of 30 minutes before serving. This crucial step allows all the incredible flavors to meld together and the layers to set further, ensuring each spoonful is a harmonious blend of coffee, chocolate, and vanilla. Serve chilled to enjoy the full refreshing experience of this easy, healthy tiramisu chia pudding.
Tips for a Perfect Healthy Tiramisu Chia Pudding
Achieving the perfect consistency and flavor for your healthy tiramisu chia pudding is straightforward with a few helpful pointers. For the most delightful texture and deepest flavor, prepare both the coffee chia pudding and creamy vanilla layer the night before. This extended chilling allows chia seeds to fully swell and flavors to meld beautifully. Adjust maple syrup to suit your personal sweetness preference; some enjoy bolder coffee, others sweeter vanilla cream. Most importantly, blend cashews thoroughly for the creamy vanilla layer. A high-speed blender guarantees a super smooth, lump-free, and luxurious cream, central to this healthy no-bake treat’s appeal.
Storing Your Sweet Creation
One of the many benefits of this healthy tiramisu chia pudding is its excellent suitability for meal prepping. You can easily prepare a batch and enjoy it throughout the week. Simply store your completed puddings in individual airtight containers in the refrigerator. When stored properly, they will maintain their freshness and delicious taste for up to 3-4 days. This makes them a fantastic grab-and-go option for a wholesome breakfast, a satisfying afternoon snack, or a guilt-free dessert, always ready to curb those sweet cravings with a nutritious and easy no-bake treat.
Nutrition Spotlight
Understanding the nutritional value of your healthy tiramisu chia pudding helps integrate this delicious treat into your balanced diet. Each serving offers substantial energy and essential macronutrients. This easy no-bake treat proves decadent desserts can align with a healthy lifestyle. Below is an approximate breakdown per serving.
**Servings: ** 2
**Calories: ** Approximately 600 per serving
**Protein: ** Approximately 15g per serving
**Carbs: ** Approximately 85g per serving
**Fat: ** Approximately 28g per serving
Improving the Cooking Method
For the most exquisite results, prioritize the overnight chill for your coffee chia pudding, as this allows maximum thickening and flavor development. Ensure cashews are completely smooth for the creamy vanilla layer; a high-speed blender truly makes a difference here, transforming them into a silky texture.
Decorate Your Dish with Your Personal Touch
Get creative with your Healthy Tiramisu Chia Pudding by varying the plant-based milk; try rich oat milk for extra creaminess or soy milk for a different profile. Feel free to adjust the maple syrup in both layers to find your perfect sweetness balance for this delightful no-bake treat.
Smart Tips for Storage and Reheating
To maintain the integrity of this layered dessert, store individual servings of your Healthy Tiramisu Chia Pudding in airtight containers in the refrigerator. This keeps the pudding layers distinct and fresh for up to 3-4 days. While the optional chocolate truffle topping is soft, storing it within the container ensures everything stays moist.
Practical Chef Advice
I’ll never forget the first time I whipped up this delicious pudding. I was rushing, thinking “who needs to chill *that* long?” My partner took one bite and said, “It’s good, but next time, trust the process!” A lesson learned, and now, perfectly set pudding every time.
Final Thoughts
As you scoop into this delightful creation, imagine the rich aroma of coffee and cocoa mingling with sweet vanilla. This layered dessert isn’t just a treat for your taste buds; it’s an effortless indulgence. Our Healthy Tiramisu Chia Pudding offers a creamy, satisfying experience without any baking required, perfect for busy schedules. With its make-ahead convenience, you can enjoy a wholesome, luxurious dessert anytime. Don’t just dream about it – whip up this easy no-bake treat today and transform your dessert routine!
Print
Healthy Tiramisu Chia Pudding | Easy No-Bake Treat
- Total Time: 20 minutes
- Yield: 2 1x
Description
This Tiramisu Chia Pudding offers a delightful, layered dessert experience. It features rich, coffee-infused chocolate chia pudding alternating with a smooth, creamy vanilla layer, all culminating in a delicate dusting of cocoa. The textures are soft and satisfyingly pudding-like, with deep notes of coffee and cocoa balanced by sweet vanilla. This no-bake treat is prepared by chilling, making it an ideal make-ahead option.
Ingredients
- **For the Coffee Chia Pudding (Bottom & Top Dark Layers):**
- 1/2 cup strong brewed coffee, cooled
- 1/2 cup unsweetened plant-based milk (almond, oat, or soy)
- 3 tablespoons chia seeds
- 1 tablespoon unsweetened cocoa powder
- 2 tablespoons maple syrup (or preferred sweetener)
- 1/2 teaspoon vanilla extract
- Pinch of salt
- **For the Creamy Vanilla Layer (Middle Light Layer):**
- 1/2 cup raw cashews, soaked in hot water for 30 minutes, then drained (or overnight in cold water)
- 1/4 cup unsweetened plant-based milk
- 2 tablespoons maple syrup
- 1/2 teaspoon vanilla extract
- 1/4 teaspoon lemon juice (optional, for a slight tang)
- Pinch of salt
- **For the Chocolate Truffle Topping (Optional, to mimic image):**
- 1/4 cup pitted Medjool dates, packed
- 1/4 cup rolled oats
- 2 tablespoons unsweetened cocoa powder
- 1 tablespoon nut butter (almond or cashew)
- 1–2 tablespoons plant-based milk (as needed for consistency)
- **For Dusting:**
- 1 teaspoon unsweetened cocoa powder
Instructions
- **Prepare Coffee Chia Pudding:** In a medium bowl, whisk together the cooled coffee, 1/2 cup plant-based milk, chia seeds, 1 tablespoon cocoa powder, 2 tablespoons maple syrup, 1/2 teaspoon vanilla extract, and a pinch of salt. Stir well to combine and ensure no clumps. Let it sit for 5 minutes, then stir again. Cover and refrigerate for at least 4 hours, or preferably overnight, until thickened.
- **Prepare Creamy Vanilla Layer:** Drain the soaked cashews thoroughly. In a high-speed blender, combine the drained cashews, 1/4 cup plant-based milk, 2 tablespoons maple syrup, 1/2 teaspoon vanilla extract, lemon juice (if using), and a pinch of salt. Blend until completely smooth and creamy, scraping down the sides as needed. This may take a few minutes to achieve a silky texture.
- **Prepare Chocolate Truffle Topping (Optional):** In a food processor, combine the pitted dates, rolled oats, 2 tablespoons unsweetened cocoa powder, and nut butter. Pulse until a sticky dough forms. If the mixture is too dry to come together, add plant-based milk, 1 tablespoon at a time, until a pliable dough is achieved. Roll the mixture into small, bite-sized balls (about 15-20 balls). Place them on a plate lined with parchment paper and refrigerate for 15-30 minutes to firm up.
- **Assemble the Pudding:** Divide half of the prepared coffee chia pudding evenly between two serving glasses or jars. Top with the creamy vanilla layer, spreading it gently. Then, add the remaining coffee chia pudding on top.
- **Garnish:** Dust the top generously with the remaining unsweetened cocoa powder. If using the chocolate truffle topping, arrange the chilled truffle balls on top of the cocoa-dusted pudding.
- **Chill and Serve:** Refrigerate the assembled puddings for at least 30 minutes before serving to allow the flavors to meld and layers to set further.
Notes
* For best results, prepare the chia pudding and creamy layer the night before to allow for optimal setting and flavor development.
* Adjust the amount of maple syrup to suit your preferred level of sweetness.
* Ensure cashews are thoroughly blended for a smooth, lump-free creamy layer. A high-speed blender is recommended.
* This recipe is excellent for meal prepping and can be stored in airtight containers in the refrigerator for up to 3-4 days.
- Prep Time: 20 minutes
Nutrition
- Calories: Approximately 600 per serving
- Fat: Approximately 28g per serving
- Carbohydrates: Approximately 85g per serving
- Protein: Approximately 15g per serving
FAQs
How long should the coffee chia pudding chill to thicken properly?
To achieve the desired thickened consistency for the coffee chia pudding, it needs to be refrigerated for at least 4 hours. For optimal results and the best texture, preparing it overnight is highly recommended. This allows the chia seeds ample time to absorb the liquids fully, ensuring a rich, pudding-like consistency that holds its shape beautifully in the layers. A well-chilled chia pudding also contributes to the overall delightful sensory experience of this Healthy Tiramisu Chia Pudding, making it a truly satisfying no-bake treat.
Why is soaking cashews necessary for the creamy vanilla layer?
Soaking raw cashews is a crucial step for creating the incredibly smooth and creamy vanilla layer in this recipe. When cashews are soaked, they soften significantly, which allows them to blend into a perfectly silky, lump-free texture. Without proper soaking, especially if not using a high-speed blender, the vanilla layer might turn out gritty. You can soak them in hot water for at least 30 minutes, or for an even creamier result, soak them in cold water overnight. This preparation ensures the luxurious mouthfeel central to this delightful dessert.
Can I adjust the sweetness in this Healthy Tiramisu Chia Pudding?
Absolutely! This recipe uses maple syrup as the primary sweetener, and you can certainly adjust the amount to suit your personal preference. The recipe suggests 2 tablespoons for the coffee chia pudding and another 2 tablespoons for the creamy vanilla layer, totaling 4 tablespoons across the main pudding components. Feel free to add a little less if you prefer a less sweet dessert, or a touch more if you have a sweeter tooth. Remember to taste as you go, especially when preparing each layer, to find your perfect balance for this easy no-bake treat.
How long can I store this easy no-bake dessert?
This delightful dessert is excellent for meal prepping and stores wonderfully, allowing you to enjoy a quick, healthy treat whenever you wish. Once assembled, you can store this Healthy Tiramisu Chia Pudding in airtight containers in the refrigerator for up to 3-4 days. For optimal flavor and texture, preparing the chia pudding and creamy layer the night before is recommended, and the assembled dessert will maintain its freshness and delicious taste throughout the storage period. This makes it a perfect make-ahead option for weekly enjoyment.