
Introduction
I’ve always been a fan of classic Snickerdoodle cookies—the soft, chewy centers, the slight crunch of cinnamon sugar, and that familiar, comforting smell that fills the kitchen. One day, while preparing a batch for a family gathering, I realized I wanted something just a little different. That’s when the idea hit me: why not turn these cookies into little cups? Something bite-sized, charming, and perfect for holding a gooey surprise. That’s how these Snickerdoodle Cookie Cups were born. I served them at the event, and they were gone before I had time to grab a second one myself. People kept asking me for the recipe, so I decided to share it here.
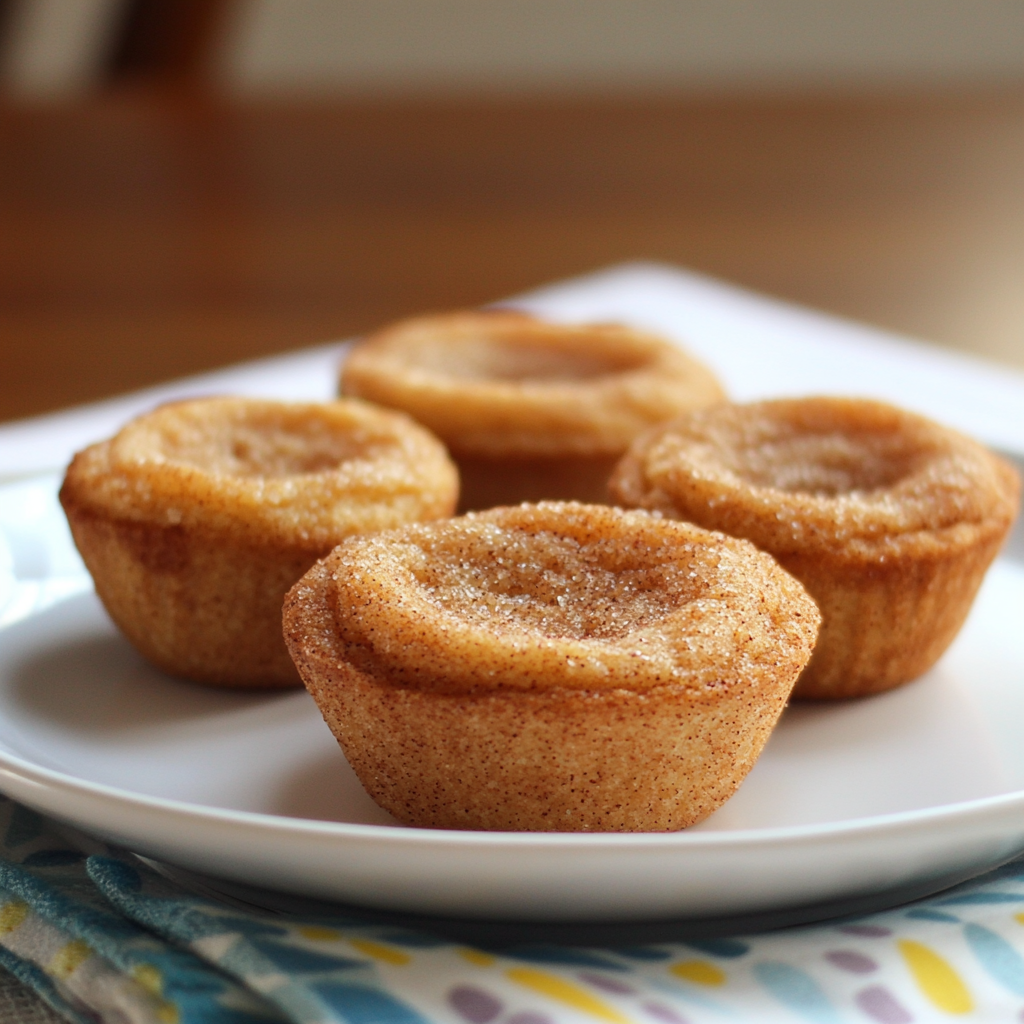
These little cookie cups aren’t just cute—they’re a perfect blend of flavor and texture. They’re slightly crispy on the outside, pillowy on the inside, and carry that irresistible hint of cinnamon sugar in every bite. Whether you fill them with vanilla cream, chocolate ganache, or a dollop of jam, they never fail to impress. And the best part? They’re easy to make and even easier to eat.
Why You’ll Love This Recipe:
Versatile
You can fill these cookie cups with whatever suits your mood—chocolate, cream cheese frosting, fresh berries, or even nut butter. The possibilities are endless, and they adapt beautifully to any occasion.
Budget-Friendly
Most of the ingredients are pantry staples: flour, sugar, cinnamon, butter. No need to buy anything fancy. You can whip up a batch without an extra trip to the store.
Ingredients for the Recipe
-
1 ½ cups all-purpose flour
-
½ teaspoon baking soda
-
¼ teaspoon cream of tartar
-
¼ teaspoon salt
-
½ teaspoon ground cinnamon
-
½ cup unsalted butter, softened
-
¾ cup granulated sugar
-
1 large egg
-
1 teaspoon pure vanilla extract
Cinnamon Sugar Coating:
-
3 tablespoons granulated sugar
-
1 teaspoon ground cinnamon
Optional Fillings:
-
Vanilla pudding
-
Chocolate ganache
-
Cream cheese frosting
-
Fruit preserves
Now that we’ve got everything ready, let’s move on to how to make these delicious cookie cups.
How to Make This Recipe
Making Snickerdoodle Cookie Cups is easier than it sounds, and the result is nothing short of delightful. With a few simple steps, you’ll have soft, golden cookie cups ready to be filled with your favorite toppings. They look impressive, but don’t let that fool you—this recipe is very beginner-friendly.
Step-by-Step Instructions
Step 1: Preheat and Prepare
Start by preheating your oven to 350°F (175°C). It’s important to give your oven enough time to reach the proper temperature, as that ensures the cookies bake evenly. While the oven is heating, lightly grease a mini muffin pan with non-stick spray or butter. You can also use a silicone baking pan for easier removal.
Step 2: Mix Dry Ingredients
In a medium-sized bowl, whisk together the flour, baking soda, cream of tartar, salt, and cinnamon. Mixing these first helps distribute the leavening agents and spices evenly throughout the dough. Set the bowl aside.
Step 3: Cream the Butter and Sugar
In a large mixing bowl, beat the softened butter with the granulated sugar until the mixture is light and fluffy. This should take about 2 to 3 minutes using an electric hand mixer on medium speed. The butter should look pale, and the texture should resemble whipped cream.
Step 4: Add Egg and Vanilla
Crack in the egg and pour in the vanilla extract. Beat the mixture until everything is fully combined. This adds moisture and flavor to your cookie dough. Make sure to scrape down the sides of the bowl with a spatula so no ingredients are left unmixed.
Step 5: Combine Wet and Dry Ingredients
Gradually add the dry ingredients to the wet mixture. Mix on low speed or stir by hand using a wooden spoon. The dough will become thick and slightly sticky—that’s exactly what you want. Don’t overmix, or the cookies may become tough.
Step 6: Shape the Dough
In a small bowl, combine the sugar and cinnamon for the coating. Roll the cookie dough into 1-inch balls, then roll each ball in the cinnamon sugar mixture until fully coated. This step is essential for achieving that classic Snickerdoodle flavor and texture.
Step 7: Press Into Muffin Pan
Place each coated ball into a cup of the prepared muffin pan. Gently press each ball down with your thumb or the back of a spoon to create a small indentation in the center. This indentation will help the cookie bake in a cup-like shape and make space for the filling.
Step 8: Bake
Bake in the preheated oven for 10 to 12 minutes. The edges should be lightly golden, and the tops will look slightly cracked. Don’t wait until they’re too brown—Snickerdoodles are meant to be soft. The centers will puff up a little during baking but will settle as they cool.
Step 9: Shape the Cups
Immediately after removing the tray from the oven, use the back of a teaspoon to gently press down the center of each cookie. This deepens the cup shape and makes room for your filling. Be careful—it’s hot work, so don’t rush.
Step 10: Cool Completely
Let the cookie cups cool in the pan for about 10 minutes. Then, gently remove them using a small knife or spoon. Place them on a wire rack to cool completely before adding any fillings. Warm cookie cups will melt the filling, and that’s not what you want.
Step 11: Fill and Serve
Once the cookie cups are completely cool, fill them with your desired topping. Spoon in vanilla pudding, pipe in cream cheese frosting, or add a small scoop of chocolate ganache. You can even top them with a fresh raspberry or a sprinkle of crushed nuts.
Quick and Easy
This recipe is perfect for bakers of all levels. It uses basic ingredients and doesn’t require any complicated techniques. With just one mixing bowl and a muffin pan, cleanup is simple and fast. From start to finish, the whole process takes about 30 to 35 minutes.
Customizable
You can easily tailor this recipe to fit your preferences. Want a touch of spice? Add a pinch of nutmeg or cardamom to the dough. Looking for a citrus twist? Stir in a teaspoon of orange zest. Prefer gluten-free? Swap the flour with a reliable gluten-free blend.
Perfect for Guests
Snickerdoodle Cookie Cups make an excellent party dessert. Their small size makes them ideal finger food, and you can prepare the cookie cups ahead of time. Simply store them in an airtight container and fill them right before serving. Your guests will love how beautiful—and tasty—they are.
FAQs (Frequently Asked Questions)
Can I make Snickerdoodle Cookie Cups ahead of time?
Absolutely! You can prepare the cookie cups a day or two ahead of time. Just bake and cool them, then store them in an airtight container. Fill them with your choice of toppings right before serving to maintain their fresh, crunchy texture.
Can I use different fillings for the cookie cups?
Yes, you can! The beauty of these cookie cups is how customizable they are. Vanilla pudding, chocolate ganache, cream cheese frosting, or even fruit preserves all make fantastic fillings. You can even make them savory by filling them with a cheese dip or guacamole for a unique twist.
How do I store leftover cookie cups?
Store any leftover filled cookie cups in an airtight container at room temperature for up to 2 days. If you have unfilled cookie cups, they can be stored in the same way for up to a week. Just make sure they’re completely cooled before storing.
Can I freeze the cookie cups?
Yes, you can freeze the unfilled cookie cups. After baking and cooling, place them in an airtight container or freezer-safe bag and freeze for up to 3 months. When you’re ready to enjoy them, thaw them at room temperature and add your desired fillings.